|
Giving to the Bit (Part1) by Tracy Porter
When the horse is "giving to the bit 'the horse is recognizing us, responding to our request
and turning over control of a body part to us
This month due to the magnitude of the subject, "Giving to the Bit", I will begin with an overview. In later issues, we will discuss the
topic more in depth by covering how the horse physically changes, how the horse benefits mentally and how it makes training the emotional side of the horse easier.
 There are many popular training practices that talk about the horse giving to rein pressure. What
makes this "Giving to the Bit" technique, unique is that it is broken down and enables us to get more in depth in the understanding of what can be attainable by teaching by this method. The
horse begins to give to the bit and soften on a single inside rein. This recognizes the fact that the horse evolves through many physical phases. Of course it doesn't end there. When we have the
horse working well on both inside reins separately, then we teach the horse to respond to the other rein, also known as the "giving to the outside rein". There are many popular training practices that talk about the horse giving to rein pressure. What
makes this "Giving to the Bit" technique, unique is that it is broken down and enables us to get more in depth in the understanding of what can be attainable by teaching by this method. The
horse begins to give to the bit and soften on a single inside rein. This recognizes the fact that the horse evolves through many physical phases. Of course it doesn't end there. When we have the
horse working well on both inside reins separately, then we teach the horse to respond to the other rein, also known as the "giving to the outside rein".
A horse's performance is greatly improved if the horse develops the proper muscles to support his
body. Not only does the horse benefit physically, by developing muscle structure, but also enhances and improves overall quality of
the gait. A result of this evolutionary process is the horse becomes more responsive and learns to elevate its front end. When we
learn how this all fits together, we can fall back on it when we notice the horse begins to stiffen. For instance, when teaching a new
maneuver it's inevitable that the horse gets heavier. If we know what to do when this happens can improve our performance with our
horse. Not only can we achieve the above, but we can also learn how to get control of the individual body parts of our horse off of
each rein and by itself, later we can talk to multiple body parts by using both reins.
When the horse is "giving to the bit 'the horse is recognizing us, responding to our request and turning over control of a body part to us.
What age does the horse need to be to teach this?
We can teach this to young horse that has never been mounted, we can also teach it to our favorite horse whether he's 4 or 40!
What discipline is this geared for? Any discipline you would like to pursue.
It's based on basic dressage, which makes the pleasure, performance, reiners, jumpers, endurance, trail and dressage horses of tomorrow!
Where do we teach this?
We can teach this on the ground and also up on the horse. By teaching it prior to the first mounting, we have taken steps to ensure a
safer first ride. One important thing we should havealready taught the horse is to move its hips over. It's nice to know that we have brakes when we may want to use them.
So, where does all this begin?
There are at least nine spots, this doesn't include the hips or shoulders. These first nine spots are only seen in order as the horse
progresses. This is what we mean by evolution. We first are looking for spot 1, when we are getting 1, the horse is automatically
starting to soften spot 2. When we see the pick up the rein and the horse is softening spot 1 and 2, we know he is already starting to
soften spot 3. This continues through all the spots on the horse. We just can't pick and choose what spots we want. For instance, the
horse begins to break at the poll when the horse is softening spot number 3. But if the horse is not giving us 1 or 2, we can't just jump in and work on 3.
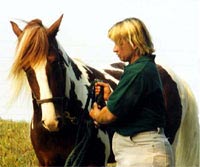
THE 9 SPOTS: See the photo!
Spot 1: The jawbone.
Spot 2: The ears.
Spot 3: The short muscle line in the neck.
Spot 4: The poll.
Spot 5: The mane, from withers to ears.
Spot 6: This is the found at the bottom of spot
7. As the horse advances the spot moves forward up the horse's neck.
Spot 7: This is a line that runs along where the shoulder and the neck meet.
Spot 8: The shoulders.
Spot 9: The withers.
In the next issue I'll write in more detail about the spots, what we are looking for and the physical changes we see in the horse. In the
mean time may your horse enjoy spending time with you, as much as you do with him!
|